TK800-Series - FAQ: IPsec
Preface
IPsec is an extension of the Internet Protocol (IP) with encryption and authentication mechanisms. This gives the Internet Protocol the ability to transport IP packets over public and insecure networks in a cryptographically secured manner. IPsec was developed by the Internet Engineering Task Force (IETF) as an integral part of IPv6. Because the Internet Protocol version 4 originally had no security mechanisms, IPsec was subsequently specified for IPv4.
Components of IPsec-VPNs
Interoperability
Cryptographic protection of transmitted data
Access Control
Data Integrity
Authentication of the sender (user authentication)
Encryption
Key authentication
Administration of keys (key management)
Behind these components are processes that, when combined, provide reliable security for data transmission over public networks. VPN security solutions with high security requirements therefore generally rely on IPsec.
Deployment scenarios
Subnet-to-Subnet-VPN
Host-to-Subnet-VPN
Host-to-Host-VPN
In principle, IPsec is suitable for gateway-to-gateway scenarios. In other words, the connection between networks via a third insecure network.
IPsec
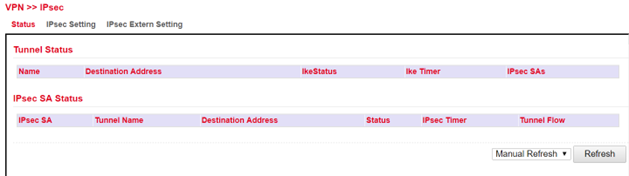
By clicking VPN > IPsec, you can initially view the status of your IPsec tunnel, if you have already created one.
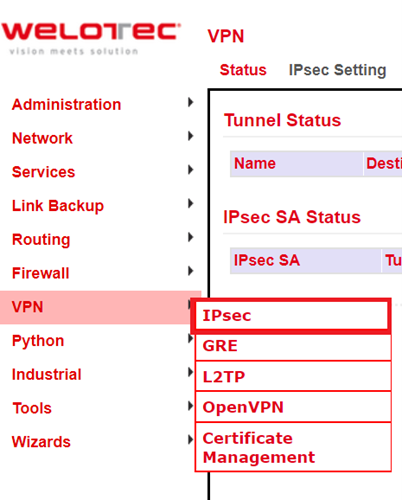
Here the options “IPsec Setting” and “IPsec Extern Setting” are available.
To create a new IPsec tunnel, proceed as follows:
Click on “IPsec Setting”
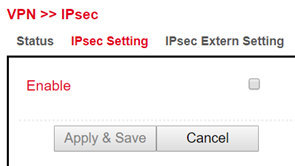
Click on “Enable”

Now you can start with the configuration. Proceed as follows:
IKEv1 and IKEv2 Policy:
To confirm your settings, press the “Add” button.
ID is used to identify the policy in the tunnel configuration and can be selected freely. The input field is an integer field.
Encryption contains a selection list of encryption methods, e.g. AES256.
Hash contains the hash algorithm, e.g. SHA1 or SHA2-256.
Diffie-Hellman Group offers the possibility to choose the key strength during the key exchange process. The higher the group, the higher the encryption, e.g. Group2 = 1024 Bit.
Lifetime is the period of validity of the IKE before it is renegotiated.
IPsec Policy:
The name is used to identify the policy in the tunnel configuration and can be freely chosen.
Encapsulating Security Payload (ESP) provides authentication, integrity and confidentiality of IP packets within IPsec. In contrast to Authentication Header (AH), the user data is transmitted in encrypted form. While AH can “only ensure the integrity and authenticity” of data, ESP increases data security depending on the encryption algorithm chosen. That is why ESP is usually used instead of AH. ESP ensures the confidentiality of the communication. The packets are encrypted. In addition, an integrity protection protects against manipulation. Choose the appropriate protocol for “Encapsulation”.
Enter the encryption in the corresponding field. The Advanced Encryption Standard (AES) is the successor encryption standard to DES (Data Encryption System). 3DES with 128 bits is still considered secure but is significantly slower than AES because of the triple encryption. AES supports 128, 192 and 256 bit long keys.
Authentication is used for authentication and can be selected with MD5, SHA1 und SHA2.
In addition to the choice between AH and ESP, you have the option of sending the packets over the network in transport or tunnel mode. In transport mode, the original IP header, i.e. IP address plus IP options, will still be used. In tunnel mode, IPsec encapsulates the entire packet including the IP header and writes a new IP header in front of it. The original IP address is no longer visible. Only when decrypting on the opposite side, the IP address together with the rest of the packet becomes visible again. Set the appropriate mode here.
IPsec Tunnels:
To create the IPsec tunnel, first click the “Add” button
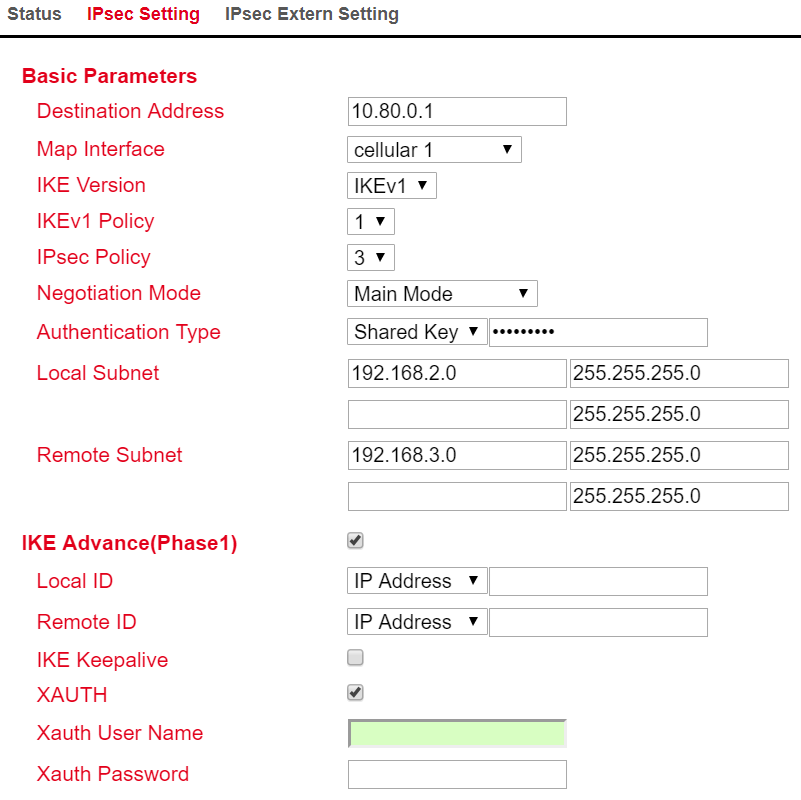
Basic Parameters
The “Destination Address” is the IP address of the tunnel remote station. Enter the corresponding IP address here.
For “Map Interface”, please enter the interface via which the connection is to be established.
Under “IKE Version”, select the version you created under IKEv1 or IKEv2. Depending on the defaults, the values in the list box will be applied.
The name of the IPsec policy created previously appears in the “IPsec Policy” field.
Under “Negotiation Mode” you can choose between two options when negotiating the IPsec tunnel. In Main Mode, the initiator (the one who wants to establish the connection) and the responder negotiate an ISAKMP-SA with each other. This negotiation happens in several steps. In Aggressive Mode, all but three of the above steps are combined, and the hash values of the pre-shared keys are transmitted in clear text. However, there may be a reason for using this mode if the initiator’s address is not known to the responder in advance, and both sides want to use pre-shared keys for authentication. Aggressive Mode should be used with caution, however, because in practice strong keys are often not used for reasons of convenience.
Select the type of authentication for “Authentication Type”. You have two options here. Either via Shared Key, the common key for authentication (to be entered in the following field) or via Certificate, i.e. via existing certificates, which then have to be imported via “VPN > Certificate Management”.
Enter the subnet of the router under “Local Subnet”. In the first field enter the IP address and in the second the subnet mask. You can create up to four entries.
Under “Remote Subnet” you can then enter the subnet of the remote station. Here, you also have the option of creating up to four entries.
IKE Advance (Phase 1)
After activation, the following options are available:
Via the “Local ID” you have the option to select different entries from the list box and then enter the corresponding data in the following field, e.g. IP Address and then enter the desired IP address in the following field.
In the “Remote ID” field, you then enter the data for the remote station.
“IKE Keepalive” you can switch on or off to maintain the IKE phase one.
You can use the XAUTH protocol for the VPN remote terminal separately by activating this function for XAUTH. You can then specify or use a corresponding username (Xauth User Name) and password (Xauth Password).
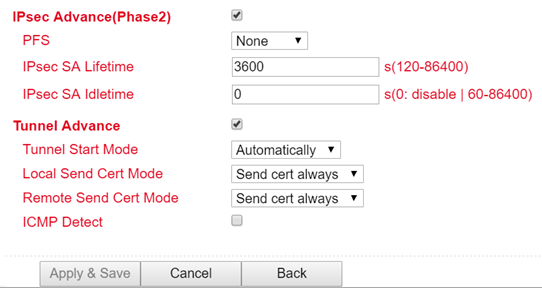
IPsec Advance (Phase 2)
After activation, the following options are available:
Perfect Forward Secrecy (PFS) is a characteristic of certain key exchange protocols in cryptography. These use previously exchanged long-term keys to arrange a new secret session key for each session that needs to be encrypted. Perfect Forward Secrecy does not have a log so that the session keys used cannot be reconstructed from the long-term secret keys after the session is closed. This means that a recorded encrypted communication cannot be subsequently decrypted even if the long-term key is known. Here you can choose between several groups that work with Diffie Hellman keys. For example, Group 1 has an encryption of 768 bits, Group2 has 1024 bits and Group 5 uses 1536 bit, etc.
You can enter the validity period of the SA (Security Association) under “IPsec SA Lifetime”. A Security Association groups IP packets together based on an SPI (Security Parameter Index), the IP destination address and the Security Protocol Identifier. An SA is only valid for ONE direction at a time, so there are always two SAs in use.
With “IPsec SA Idletime” you specify whether SAs associated with inactive peers can be deleted before the global lifetime has expired. The 0 means that the function is disabled.
Tunnel Advance
After activation, the following options are available:
For “Tunnel Start Mode”, set how the tunnel should start. The default setting is always automatic.
In the “Local Send Cert Mode” field, you specify when a certificate should be sent for the local area. The default setting is that the certificate should always be sent (Send cert always).
With “Remote Send Cert Mode” you define when a certificate should be sent for the remote site. The default setting is that the certificate should always be sent (Send cert always).
image
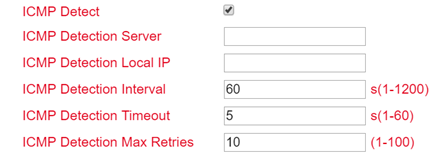
With “ICMP Detect” you can activate or deactivate the ICMP Watchdog function.
For “ICMP Detection Server”, specify the address of a server that can only be reached through the tunnel.
Under “ICMP Detection Local IP”, enter the router interface IP of the local subnet.
Under “ICMP Detection Interval”, specify the interval at which the ICMP packet is to be sent.
“ICMP Detection Timeout” is the timer after which the ICMP packet is discarded. Enter a value here between 1 and 60 sec.
“ICMP Detection Max Retries” are the maximum attempts after a failed ICMP ping, which you can enter here.
IPsec Status
If the IPsec tunnel(s) have been successfully established, then you will see the following in the status overview.